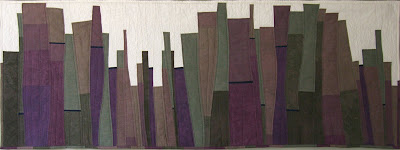
I have finished my cityscape quilt, which is a wall hanging rather than a practical quilt. During the past few weeks I took some snaps to show you how I made it.
I always plan my quilts on paper first. I can’t help it; it’s the architect in me! The design always evolves a bit along the way, but I like to know how I’m going to proceed.

The fabric I used was the fabulous hand-dyed stuff I’m always harping on about. You can get it
here.

First I made up some wide bands, sewing together coloured fabric at the bottom to cream at the top. I made loads of these with varying amounts of ‘sky’.

I stuck these bands onto the piece of flannel on the wall to check the composition and to decided what colour band I needed to sew next. The flannel is great because the pieces stick without the need for pins, meaning I can shuffle things around easily.

Once I had sewn most of the bands I began to cut the curved strips that will form the buildings. It’s important when sewing curved seams that adjacent pieces have exactly the same curve, or they won’t lie flat when sewn together. To ensure this I overlapped the edges of the material and cut through both pieces at once using a rotary cutter.

Cutting the final strips took about a week, because I had to keep rearranging them, and sewing more bands if I wanted specific colours or sizes in certain places. Again, I stuck them up on the flannel wall to see the final layout. Once all the strips were cut I numbered them so they wouldn’t get muddled during sewing.

Sewing curved seams is easy as long as you have cut them identically to begin with. Turn the rights sides together, and match up the edges at the top. The rest of the edges won’t match up at all, because the curves will be going in opposite directions. Don’t panic about this. Just start sewing slowly. Every few stitches manoeuvre the pieces so that the edges that are disappearing under the presser foot are lined up. Try not to stretch the edges of the material.

Once I had sewn all the strips together I ironed the seams flat and layered up the quilt.


A quilt is made from 3 layers. The pieced top, a middle layer of wadding, and a backing. I have to layer my quilts on the living room floor because it’s the only flat surface big enough. I use safety pins to secure the 3 layer together ready for quilting.

Quilting is basically the sewing together of all 3 layers. I did mainly machine quilting on this quilt. To get the bulk of the quilt through the machine I roll the sides up tightly. (I also have a special ‘walking foot’ attachment on my machine which has feed dogs on the top as well as the bottom. You can quilt without the walking foot but sometimes the bottom layer gets pulled through faster than the top and it all gets a bit skew-wiff.)

I decided to use the quilting lines to echo the sewn pieces and also to suggest more buildings in the foreground.

I also did some hand quilting on the sky using pale green thread in a random seed stitch.

Nearly done now. Next I cut the edges square and straight and sewed on the binding. To make the binding I used a 2 inch strip folded over twice and sewn down, first to the back and then through all layer on the front.

To hang it on the wall I attached a long sleeve to the back and slid in a wooden batten. All finished!


